Hook timing: when will I know I need one? And how to do a hook timing?
Hook timing on a commercial embroidery machine is the proper positioning of the hook assembly in relation to the needle to form a stitch.
Buy hooks here:
Koban Rotary Hook – High Quality (Small)
When to know you need to adjust hook timing:
Hook timing usually does not need to be adjusted routinely because the hook is directly attached to the drive shaft. However, you may need to re-time the hook if:
Something gets caught in the hook assembly.
The size of the needle is changed by more than one size.
An accumulation of thread behind the hook pushes it out of alignment.
The machine is failing to form and complete a stitch.
The machine is making a loud clapping noise.
A “bird’s nest” of thread jams the bobbin area, forcing the hook out of its proper position.
How to do hook timing:
The process for adjusting hook timing can vary by machine model, so you should always consult your machine’s manual. A general process may include the following steps:
Rotate the main drive pulley until the indicator points to a specific degree, such as 25 degrees, depending on the machine type.
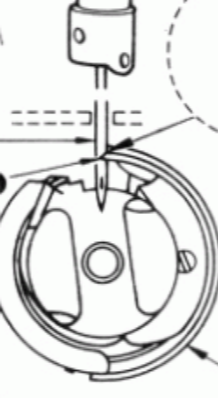
At this point, the tip of the hook should be directly behind the scarf of the needle and above the needle eye.
Check the clearance between the hook point and the back of the needle; it should be approximately one-half to one thread-width.
If the timing is off, you will need to loosen the screw and adjust the hook’s position.
After adjusting, tighten the screw, and then manually rotate the handwheel a few times to ensure everything is clear and the needle is not hitting the hook.
Finally, perform a test run, such as stitching the letters “H O X,” as they use various pantograph directions and will help you check for any skipped stitches.