What can I do to avoid puckering from embroidery, especially on big designs?
When you’re dealing with embroidery puckering, especially on large designs, it’s often a combination of factors rather than a single issue. A skilled embroidery operator knows that puckering is a battle fought on three key fronts: proper hooping, balanced tensions, and, to a lesser extent, machine timing.
Here is a detailed breakdown of what an embroidery operator can do to avoid puckering.
1. Hooping: The Foundation for Flat Embroidery
Proper hooping is the single most critical step in preventing puckering. The goal is to create a taut, drum-like surface without stretching the fabric. This provides a stable foundation for the machine to stitch on.
Choose the Right Hoop: Use the smallest hoop that will comfortably fit the entire design. The closer the hoop is to the design, the more stable the fabric will be, reducing the chance for fabric movement.
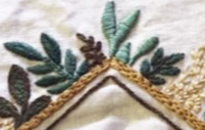
Use the Right Stabilizer: For large, dense designs, you will almost always need a heavyweight, cut-away stabilizer.
Cut-away stabilizers are the most stable and remain in place to support the stitches after the embroidery is finished, which is crucial for high-stitch-count designs on stretchy fabrics like polo shirts.
Tear-away stabilizers are generally for lighter designs on stable woven fabrics. Using them on a dense design will likely result in the fabric contracting and puckering.
Hoop with Care:
Lay the stabilizer flat on the inner hoop.
Place the garment on top of the stabilizer, smoothing it out by hand to remove any wrinkles.
Press the outer hoop down firmly to secure the fabric. The fabric should be taut and feel like a drum when you tap it.
Do not stretch the fabric, especially knits like polo shirts. Stretching the fabric in the hoop will cause it to relax and pucker as soon as it’s removed. Instead of pulling the fabric, use a temporary adhesive spray or a fusible stabilizer to bond the fabric to the stabilizer before hooping. This prevents shifting without distorting the material.
2. Thread Tensions: The Tug-of-War
Thread tension refers to the amount of pull on the top (needle) thread and the bottom (bobbin) thread. If these are not balanced, the threads will pull on the fabric, causing it to distort and pucker.
Understand the “1/3 Rule”: The ideal tension for a straight-stitch satin column is that on the back of the fabric, you should see about one-third bobbin thread down the center, flanked by one-third top thread on each side.
Adjust Bobbin Tension First: The bobbin tension is the foundation. It should be firm but not too tight. A good way to test this is by holding the bobbin case by its thread tail and giving it a small jerk. The case should drop an inch or two. If it drops too easily, tighten the screw on the bobbin case in tiny increments. If it doesn’t drop at all, it’s too tight.
Adjust Top Thread Tension: Once the bobbin tension is set, adjust the top tension. For large, dense designs, you may need to slightly loosen the top tension to prevent the dense stitch count from pulling the fabric together.
Consider Thread and Fabric: The type and weight of the thread and fabric affect tension. Polyester thread is very strong, and on a thin, delicate fabric, you may need to loosen the tension slightly to avoid pulling.
3. Machine Timing and Beyond: Advanced Considerations
While hooping and tension are the operator’s primary tools, other factors play a role, some of which are machine-related or involve digitizing.
Machine Timing: This is the synchronization between the needle and the rotary hook. If the timing is off, it can lead to inconsistent stitches, thread breaks, and puckering. This is typically a maintenance issue that requires a qualified technician to service the machine. An operator’s role here is to recognize the symptoms (repeated thread breaks, skipped stitches) and alert maintenance.
Digitizing the Design: A poorly digitized design is a common cause of puckering, especially with large designs.
Underlay: A good digitizer will use underlay stitches to stabilize the fabric and create a foundation for the main stitches. For dense designs, a criss-cross or mesh underlay provides more stability, like superpunch invisible mesh: https://superpunch.com/shop/1-5-oz-cut-invisible-mesh-stabilizer/
- Density: Designs with an excessively high stitch density will cause puckering regardless of hooping or tension. An experienced digitizer will reduce the stitch density for large designs and use different fill patterns to achieve the desired look without over-stitching.
- Stitch Direction: Varying the stitch direction in a fill can also help to distribute the tension and minimize puckering.
Machine Speed: Running the machine at a slower speed, especially on large, dense designs, gives the machine time to form perfect stitches and reduces the stress on the fabric and thread, which can help prevent puckering.
By focusing on these details—firm hooping without stretching, balanced tensions, and using the correct stabilizer for the design—an embroidery operator can significantly reduce or eliminate puckering on even the most challenging large designs.